
| Part | Number | Description | |
| U1 | MAX232 | ||
| U2 | 63B09 | CPU | |
| U3 | 68B50 | ACIA | |
| U4 | 62256 | RAM | |
| U5 | 74HCT04 | NOT | |
| U6 | 27C256 | ROM | |
| U7 | 74LS00 | NAND | |
| K1 | 16 Pin | Socket | |
| K2 | 40 Pin | ||
| K3 | 24 Pin | ||
| K4 | 28 Pin | ||
| K5 | 14 Pin | ||
| K6 | 28 Pin | ||
| K7 | 14 Pin | ||
| JP1 | Jumper | ||
| JP2 | Jumper | Bank | |
| J1 | Male | TTL Serial | Doesn't match the CH340 pin for pin, Can suppy +5v |
| J2 | Barrel Female | 5v Center | |
| DE9 | DE9 Female | ||
| RP1 | 4k7 | R Pack | |
| R1,R3-R4 | 2k7 | TTL Serial | |
| R2 | 2k2 | ||
| R5 | 470R | ||
| R6 | 4k7 | ||
| R7 | 4k7 | ||
| R8 | 4k7 | ||
| R9 | 100R | Pull up Reset | |
| C1-C4 | 1uF | RS232 | |
| C5 | 100nF | ? | |
| C6-C7 | 15pF | ||
| C8-C13 | 100nf | ||
| C14 | 470uF | Power | |
| C15 | 10uF | Reset | |
| Q1 | 7.3728MHz | xtal | |
| D1 | 1N4002 | ||
| D2 | RED LED | ||
| SW1 | NO Momentary | PB |
US Home
Automation
(Last updated: Monday, December 21, 2020)
Automation
(Last updated: Monday, December 21, 2020)
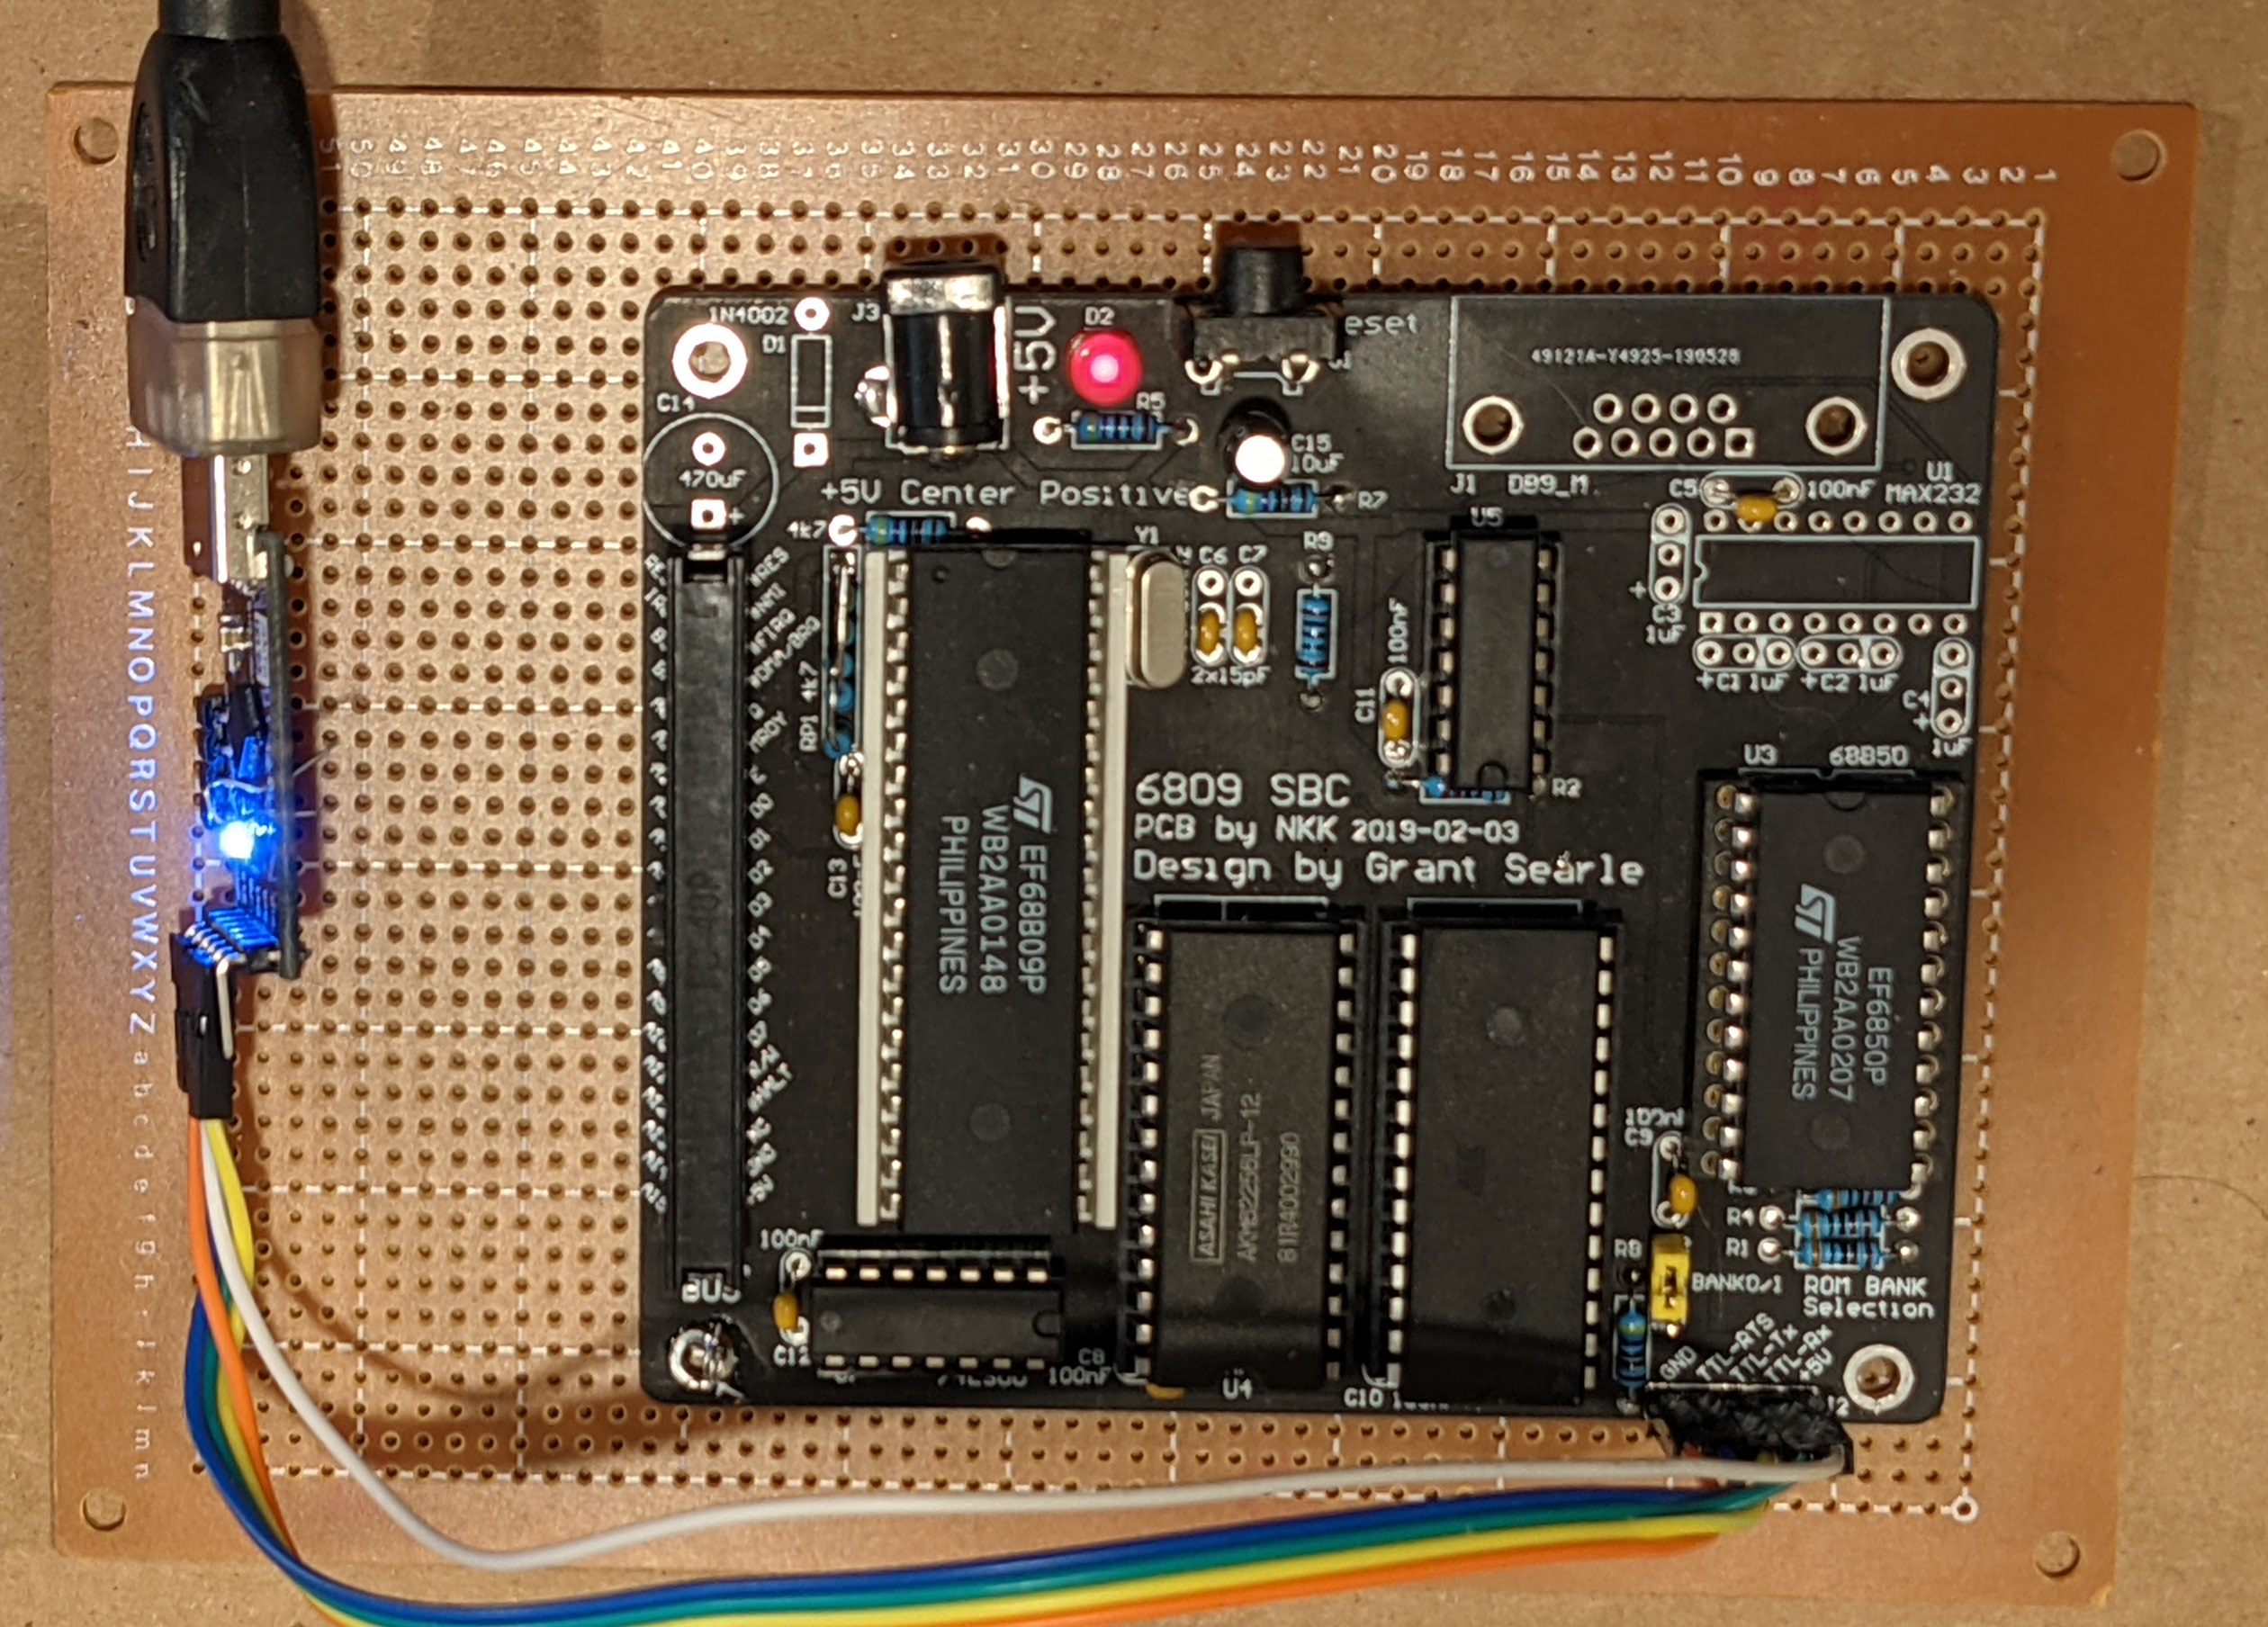
Grant Searle's Simple, 7 Chip 68B09 SBC
I built a 7 chip Grant Searle's 68B09 SBC, pretty isn't it? You can't see the PROM chip very well but it's a 28F256 that I'm only using the upper hald at this time. I'm powering the SBC off the 5V from the CH340 USB TTL Serial dongle. This one happens to be a direct connect to the USB's 5v0 line. Not all USB Dongles have that. Many have e current limiting resistor on the 5V and can't supply enough current to run the board. You'll need to check for that or provide external power.
I've loaded Jeff Tranter's SBC combined ROM code into the upper half of the 28F256. I did have some difficulties with getting the code burned to ROM as there was code in the S19 file that was below the 0xC000 starting point of the ROM. The simple work around is to remove the lines before the code starting at C000. This is because the code in the ROM copies the code down into the RAM at startup. I'll fix the asm code so it assembles properly. At the moment I'm having a bit too much fun playing with the board, assembly language and CoCo Extended BASIC.
As I'm playing I'm putting together notes of things that I'm finding. I've used many dialects of BASIC (Atari, Dartmouth, MC10, 8052-BASIC, etc.) so I'll add some obvious notes and some differences I find. I have 3 Tandy CoCo's (1/2/3) but haven't had much time to play with their BASIC. I'll also note the commands and notes when I do something that I don't think is clear or requires information from a variety of sources.
One of the reasons for playing with this board, besides it's fun and one of my favorite processors, is to hook up a CH386 Parallel to USB interface. I'd really like to have modern USB keyboards on some of my clasic computers. Let's face it, the keyboard on the ZX81 is terrible.
Parts list
Specification
- 16K ROM
- 32K RAM
- 68B09 Processor with a 7.3728MHz crystal (1.8432MHz clock)
- 115200 Baud serial interface, RS232 specification voltage levels
- Power consumption - ~200mA
- Microsoft Extended BASIC, as used in the Tandy Coco 2 (modified for the SBC with all I/O via serial. Commands not applicable for the SBC have been removed)
- Minimal possible component count - 6 ICs and a small number of discrete components (inverter on interrupt make 7)
Memory Map
| 0000-7FFF | 32K RAM |
| 8000-9FFF | FREE SPACE (8K) |
| Use JP1 (off board) | |
| A000-BFFF | SERIAL INTERFACE (minimally decoded) |
| Split into 2 and use a 74LS138 (3 line to 8 line, 1 of 8 decode) to split int 512B boundaries. This requires a mod on the 68B50 select. | |
| A000-AFFF | |
| B000-BFFF | |
| C000-FFFF | 16K ROM |
| (BASIC from DB00 TO FFFF, so a large amount of free space suitable for a monitor etc) | |
| (Jeff's combined ROM contains BASIC, ASSIST09, Trace and Disassembler in the C000-FFFF range) |
SBC 6809 Notes
Jeff's ROM image contains an enhanced Extended BASIC (minus commands not needed by the SBC), ASSIST09 with no 6840 support (could be added), Trace and a Disassembler). On a 27C256 (32K) additional firmware can be added in the second bank (upper 16K) by changing a jumper. A 27512 (64K) could provide 4 16K banks (requires board mod).
Note: ASSIST09 is normally assembled with the 6840 at $E000 and the ACIA at $E008. This SBC has the ACIA at $A000 but no support for the 6840. It could be added in the $8000 range which is currently unused.
All BASIC commands are upper case. Some of the memory locations (GIVABF - $CC7B, INTCNV - $CB74, etc.)
When using copy-n-paste from the terminal (Linux, Windows, Mac, etc.) to the SBC with the USB TTL dongle, make sure you have at least 1ms delay between chracters and about 5ms delay for the newline. This is because USB sends packets of data so if the SBC is expecting 1 character and de-asserts CTS there are still a few bytes in the USB packet. So some characters may still be in the pipeline when the SBC says stop.
I've found that when typing or pasting 80 characters or more that the SBC breaks the line on the screen but it's actually unbroken. Max line length is 255 characters.
In the beginning ...
Okay before we can use this we need to put software into the PROM (firmware). Using Jeff's combined firmware. To assemble it you'll need the as9 assemble, which is part of Lennart Benschop's 6809 Simulator/Emulator. The good news is that Jeff has already assembled the files and they're in Motorola .s19 and Intel .hex formats. The .s19 file has a couple of lines that are outside the address range of the ROM. You can manually edit the file, remove the lines, then send to the burner. If that doesn't make sense, just use the Intel .hex file. Oh, if you burn the file to a PROM larger than 16K make sure you put it in the correct bank of 16K. When I burned the firmware to a PROM I used a 28F256. The firmware was put in the upper 16K of the chip. I'm hoping to add Forth to the lower 16K at a later date.
The reason I chose the combined ROM was so I had a ROM monitor (ASSIST09) and BASIC in the same 16K bank. As a bonus Jeff added a few more commands to ASSIST09. I grew up with Omnimon in my Atari 800 and 800XL so I'm a bit spoiled by having access to something that can let me poke around. I haven't worked out all the details of how to get in and out of ASSIST09 from BASIC yet.
Let's play
Okay so you assembled the board, you've burned a ROM and now you're ready to start playing the your 6809 board. Make sure the ROM select jumper is in the correct positions. I put my firmware in the top of the 28F256 PROM I'm using so I removed the jumper.
From Linux I'm using: minicom with the following: minicom -w -c on -8 -D /dev/ttyUSB0 . I still needed to set the Terminal setting Newline tx delay to 5ms and Character tx delay. Those are guessed values, you may need to experiment if you get dropped characters.
Welcome to minicom 2.7.1

OPTIONS: I18n
Compiled on May  6 2018, 08:02:47.
Port /dev/ttyUSB0, 11:49:38

Press CTRL-A Z for help on special keys

ASSIST09
>G C000
6809 EXTENDED BASIC
(C) 1982 BY MICROSOFT

OK
? MEM
 32016
OK
? 22/7
 3.14285714
OK


CTRL-A Z for help | 115200 8N1 | NOR | Minicom 2.7.1 | VT102 | OFFLINE | ttyUSB0
Reset BASIC
One thing I found a bit odd was that if I hit the reset button, my existing BASIC environment remains after I jump from ASSIST09 to BASIC. This is a warm start, where ASSIST09 and BASIC don't reinitialize the envioironment. That's not a bad thing but it can be a bit confusing. So when I want to really reset to a clean environment, a cold start, I need to POKE 0 to &H6E, then jump to the the reset vector at &HFFFE (or hit the reset button) and then G C000 when in ASSIST09 to return to BASIC. I think using the BASIC NEW command should accomplish the same thing for cleaning up BASIC.
POKE &H6E, 0:X=PEEK(&HFFFE)*256+PEEK(&HFFFF):EXEC X

ASSIST09
>M 6E
00-
>G C000
6809 EXTENDED BASIC
(C) 1982 BY MICROSOFT

OK


CTRL-A Z for help | 115200 8N1 | NOR | Minicom 2.7.1 | VT102 | OFFLINE | ttyUSB0
Max line length
When entering test into BASIC the software will wrap at 78 characters but things like LIST will wrap at 80 characters. There's nothing wrong, that the way to software is setup. Also BASIC has a maximum line length of 250 characters. An example below shows that show both the auto line wrap and the maximum line length.
0 REM ***1*********2*********3*********4*********5*********6*********7********
*8*********9*********0*********1*********2*********3*********4*********5******
***6*********7
LIST
0 REM ***1*********2*********3*********4*********5*********6*********7*********8
*********9*********0*********1*********2*********3*********4*********5*********6
*********7
0 REM ***1*********2*********3*********4*********5*********6*********7*********8
*********9*********0*********1*********2*********3*********4*********5*********6
*********7*********8*********9*********0*********1*********2*********3*********4
*********
LIST
0 REM ***1*********2*********3*********4*********5*********6*********7*********8
*********9*********0*********1*********2*********3*********4*********5*********6
*********7*********8*********9*********0*********1*********2*********3*********4
*********
OK


CTRL-A Z for help | 115200 8N1 | NOR | Minicom 2.7.1 | VT102 | OFFLINE | ttyUSB0
Calling Assembly from BASIC
Note: This is a work in progres
BASIC make it quick and dirty to write some code but there are times when something a bit more powerful is needed. Here's what I've found so far: DEFUSRn ADDR, CLEAR x, addr and USRn(v). First I clear space for my binary, then assign a USRn (where n is 0 through 9), then poke your binary into the cleared space, then call USRn with the value passed. Inside the binary there needs to be some special handling of the passed value, the return code and the actual return to BASIC.
                                Work in progress


CTRL-A Z for help | 115200 8N1 | NOR | Minicom 2.7.1 | VT102 | OFFLINE | ttyUSB0