
Automation
(Last updated: Sunday December 10, 2017)
SIO2PI
I recently got the urge to hot rod one of my Atari computers. Technically the Atari 800 is a bit modified with the Omnimon upgrade. But I wanted to play around with an Atari with a 65C816 and some extra memory (like 512k or so). I've picked up a 600xl of unknown condition and I hope to attempt to power it up soon. I've gathered all sorts of notes on the board I'll need to drop the 65C816 in place of the custom Atari 6502C (not a 65C02 or a fast 6502). It just needs to derive the Phase 1 and 2 clock and add a halt so the ANTIC can do DMA. In addition I plan to have ram from $0000 through $80000 (512Kx8). This will be 12ns Async SRAM so I think I can get away with zero wait state and possibly get rid of the refresh. Yes it's silly to play with old computers in this fashion. But I like exercising my electronics skills. The Pi and the Arduino don't really challenge my skills that much.
Now the reason for this page. Take one Raspberry Pi Zero, a level converter board (3v3 to 5v0) add an Atari 800xl (and later the 600xl), a MAC/65 compatible assembler, CC65, TBXL (all under Linux) and you have a rather interesting device. Yes the Pi is overkill but for ~$12 (US) I've got a 1050 like drive that can pull software from a networked drive (NFS or CIFS). I should also be able to steal the R: device from the Atari800 emulator (yes you can run that on the Pi too) and the Atari 800xl can ride the internet with the best of the retro systems. :-)
I'll have pictures and stuff here as I get all of this working. At the moment I'm gathering up the parts and testing out the computers.
Notes
 - SIO2PI Adapter 1
 - SIO2PI Adapter 2
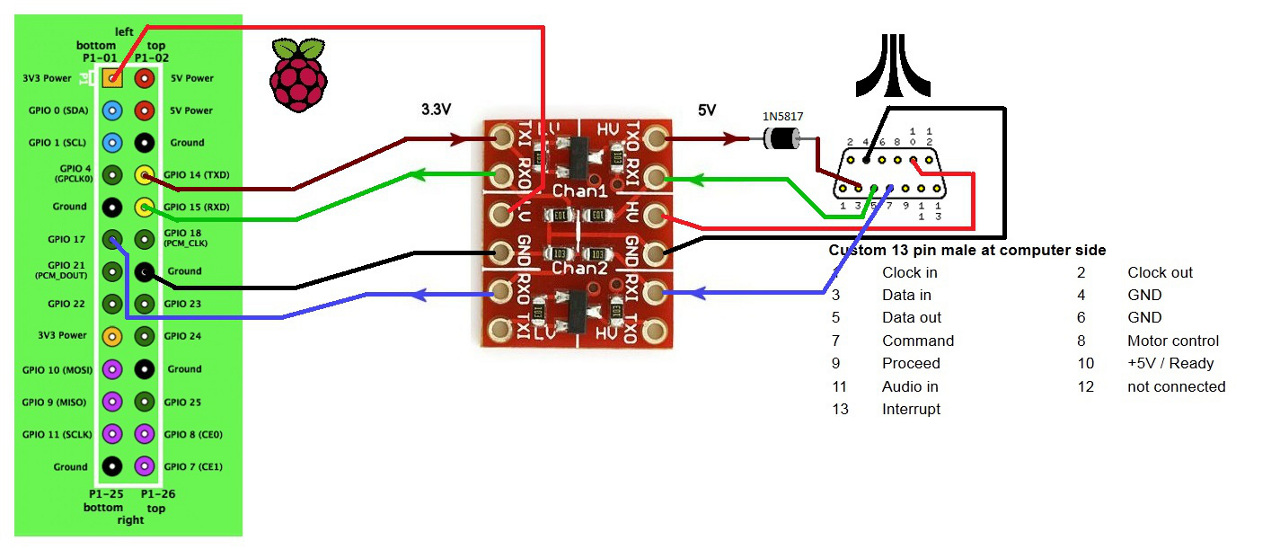
Atari 2 Level Shifter
+ -
SIO 3 (data in) --|>|--- < TXO (Chan1) via diode (for example 1N5817) direction from Atari to the level shifter
SIO 5 (data out) - > RXI (Chan1)
SIO 10 (+5V Ready) - < HV
SIO 4 (gnd) - - GND
SIO 7 (command) - > RXI (Chan2)
+ -
5.0 --|>|-- 4.3
-0.7
Level Shifter 2 Raspberry Pi
TXI (Chan1) - P1_08 (GPIO14 / TxD)
RXO (Chan1) - P1_10 (GPIO15 / RxD)
LV - P1_01 (+3,3V)
GND - P1_06
RXO (Chan2) - P1_11 (GPIO17)
http://atariage.com/forums/topic/209010-sio2pi-raspberry-pi-as-a-floppy/
Some time has passed since the initial design was posted here, and in the
meantime sparkfun has dropped the used version (BOB-08745) of the level
converter in favour of a bidirectional one (https://www.sparkfun.../products/12009).
This means (beside a different product to purchase) there are also some minor
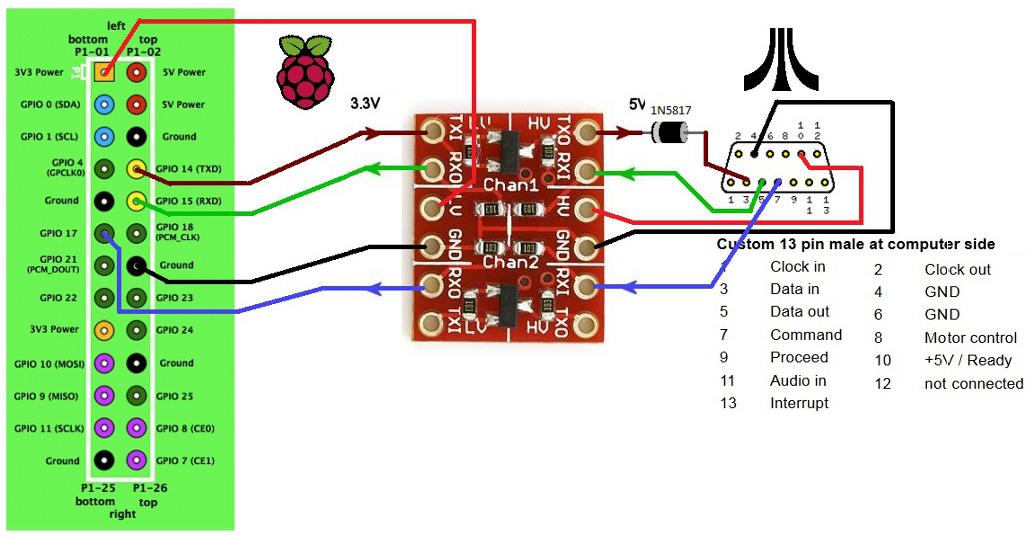
changes in the naming of the connections. The connections to be made to the BOB-12009
Level Shifter are:
*** Atari TO Level Shifter
SIO 3 (data in) --|>|--- HV1 *via diode (for example 1N5817) direction from Atari to the level shifter*
SIO 5 (data out) - HV2
SIO 10 (+5V) - HV
SIO 4 (gnd) - GND
SIO 7 (command) - HV3 *OPTIONAL*
*** Level Shifter TO Raspberry Pi
LV1 (Chan1) - P1_08 (GPIO14 / TxD)
LV2 (Chan1) - P1_10 (GPIO15 / RxD)
LV - P1_01 (+3,3V)
GND - P1_06
LV3 (Chan2) - P1_11 (GPIO17) *OPTIONAL*
The patched version of sio2bsd from this post does not need the optional wire and
works fine without it - at least on my setup.
I initially purchased the SIO2PC/10502PC Dual-USB device from Atari8Warez for use
with my Raspberry Pi. And described the installation in
http://atariage.com/forums/topic/225479-raspberry-pi-sio2pc10502pc-dual-usb
everything from that post can be used with this device as well. The modification
of the /etc/inittab file (to free up the serial port on the pi) is the default
setting of the distribution used in the post, so it's all (solder,) plug and play!
*EDIT* Almost forgot: due to the use of the 'internal' UART (serial port) of the
Pi with this device, replace /dev/ttyUSB0 from my installation post with /dev/ttyAMA0
To use UART for our goals, we need to edit two files on the Raspberry:
/boot/cmdline.txt
/etc/inittab
More details:
http://www.irrationa...is-serial-port/ (http://www.irrational.net/2012/04/19/using-the-raspberry-pis-serial-port/)

Now we need the software.
I've tested two software tools with the Raspberry Pi:
- sio2bsd from drac030 http://drac030.krap....-inne-pliki.php (http://drac030.krap.pl/en-inne-pliki.php)
- AspeQt from Fatih Aygün http://sourceforge.n...rojects/aspeqt/ (http://sourceforge.net/projects/aspeqt/)

The first tool does not need hardware handshaking, so no changes were required in the code.
After adapting the makefile I could easily compile the code.

Thanks to drac030 I can offer you software download of the Raspberry Pi version (sio2bsd.tar.gz).
Some time has passed since the initial design was posted here, and in the meantime sparkfun has dropped the used version (BOB-08745) of the level converter in favour of a bidirectional one (https://www.sparkfun.../products/12009). This means (beside a different product to purchase) there are also some minor changes in the naming of the connections. The connections to be made to the BOB-12009 Level Shifter are:

*** Atari TO Level Shifter
SIO 3 (data in)  -->|--- HV1    *via diode (for example 1N5817) direction from Atari to the level shifter*
SIO 5 (data out)       - HV2
SIO 10 (+5V)           - HV
SIO 4 (gnd)            - GND
SIO 7 (command)        - HV3          *OPTIONAL*

*** Level Shifter TO Raspberry Pi
LV1 (Chan1) - P1_08 (GPIO14 / TxD)
LV2 (Chan1) - P1_10 (GPIO15 / RxD)
LV          - P1_01 (+3,3V)
GND         - P1_06
LV3 (Chan2) - P1_11 (GPIO17)   *OPTIONAL*

The patched version of sio2bsd from this post does not need the optional wire and works fine without it - at least on my setup.