Automation
(Last updated: Wednesday, December 18, 2019)
My Smart Home Demo board
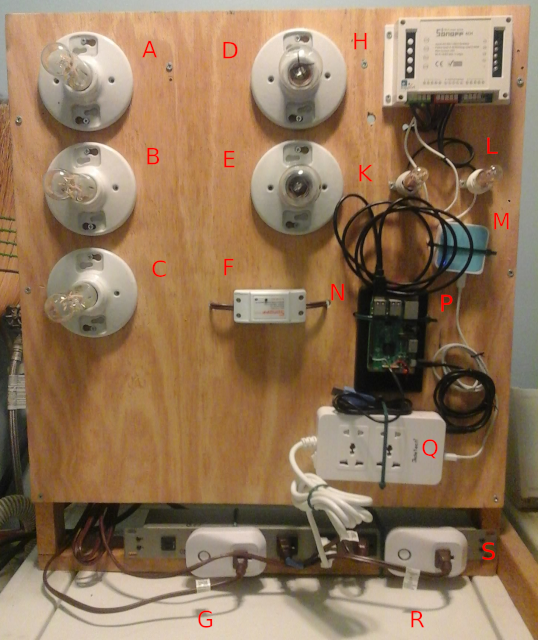
Here's my HA Demo board that I use with my Presentations at Trenton Computer Festival.
Purpose
This is a meant to be a small system with DIY'rs in mind. A starter system or a system for a flat or apartment. A system that is not overly difficult to build, easy to maintain, easy to understand and still allow the user to learn the technologies and expand the system as they see fit.
Basically a simple home automation setup. Something a DIY'r can do without having to know a lot about all the different technologies that can go into building your own home automation.
I started with a Raspberry Pi 3B and I probably could have run this on a Pi 2B. It is small, it's quiet, it doesn't generate a lot of heat, it can run headless, it's wireless and it's cheap. It has 1 gigabyte of RAM, which is plenty for a small HA system. I'm pretty sure the number of devices can grow quite a bit more before we need to worry about adding swap space, a computer with more memory or a more powerful processor. I have an 8 gigabyte SD card but since I actually use a 110 gigabyte SSD as root the SD card is only used to boot with and occasionally write to it to upgrade the kernel. The reason for the SSD was to avoid the issues with logging to the SD which tends to mess up the SD card. Note to self: need to explain this a but more and provide ways to avoid these issues. The 110 gigabyte SSD is overkill but it was inexpensive and has no moving parts so it's quiet and reliable. The current demo setup uses less than 3 gigabytes of SSD space and that include the operating system and utilities.
Hardware
We'll start with a pretty picture and work from there.
It is important to note that the powered USB hub (not shown) was added later when it was found that the Raspberry Pi didn't always start up properly bcause there wasn't enough power for the Pi and the USB SSD. The powered hub provides a steady 5 volt power supply that isn't shared with the Raspberry Pi.
Software
- Linux - Debian - Raspbian - Headless
- screen
- node.js
- Node-Red
- mytimeout (optional - a Node-Red module I use in my demo)
- Mosquitto (MQTT)
- Mosquitto Client
- Tasmota Firmware
Installing operating system images
Installing operating system images
  mount SD
  touch ssh
  create the wpa_suplicant.conf
  change hostname

  apt install xxxxx

  #
  configure ssh

  configure mosquitto
  # What about tls/ssl?

  zigbee2mqtt
  # ?

  zwave2mqtt
  # ?

  configure node-red
  # What about tls/ssl?

  # db?

