
Automation
(Last updated: Saturday Mar. 18, 2017)
TCF2017 - Do It Yourself Home Automation and More ...
This is my 2017 Trenton Computer Festival Presentation on DIY Home Automation. In the past I've explained the technology but I've never really demonstrated it. This time I'm demonstrating it.
Note: Need the image of what we're building here
What you'll need
- Raspberry Pi 3. (Actually any Linux computer with a network interface or other OS that can use a VM with Linux loaded but the instructions are geared towards the Raspberry Pi 3)
- Raspbian Lite image (best choice? -???)
- Mosquitto
- NPM
- Node.js (server side Javascript)
- Node-Red
- node-red-dashboard
- node-red-contrib-bigtimer
- sudo apt-get install sense-hat
- Arduino IDE
- ESP8266 Support
- SD Card
- SSD (optional)
- USB 5v 2A Power Supply
- network switch
- WiFi AP
- ESP8266 based devices
- ESP-01
- Adafruit Huzzah board
- Sonoff Smart Switch
- 25Q32 (needed for OTA upgrade)
- Sensor
- Relay
- LED
- Resistor
- Linux VM image
Install
Bascially I followed the instructions on Adafruit's site for Using an External Drive as a Raspberry Pi Root Filesystem. I have a Raspberry Pi 3 but the Adafruit link should also work with a Raspberry Pi 2. I'm not sure about the Pi 0. I think the 3 can go one step further and actually boot from the USB (or network or ...). The Raspberr Pi can not. It's still booting from the SD card but once boot no longer uses the SD as it's root filesystem.
- run raspi-conf
- hostname
- boot options
- CLI login
- Localisation Options
- Change Locale
- Change Timezone
- Change Wi-fi Country
- Interfacing Options
- SSH
- Advanced Options
- Internationalization
- Internationalization
$ sudo raspi-conf
#
# Need to redo fstab
# Need to redo sshd
# Need to redo /etc/issue*
# tools for mount cifs
#
$ sudo apt-get install mosquitto
$ sudo apt-get install mosquitto-clients
$ sudo apt-get install node.js (hmm, may need to a git)
$ sudo apt-get install npm
$ sudo apt-get install node-red
$ sudo apt-get install arduino
$ sudo apt-get install java
- Load SD Card
- Basic setup
- apt-get mosquitto
- apt-get mosquitto tools
- apt-get node.js
- apt-get npm
- apt-get node-red
- download arduino - http://www.arduino.cc/en/Main/Software
- download java - http://java.sub.com
$
after text
$ ls /tmp/*.out
/tmp/19033-rtsp.out  /tmp/19140-rtsp.out  /tmp/19204-rtsp.out  /tmp/23505-rtsp.out  /tmp/28895-rtsp.out
/tmp/19109-rtsp.out  /tmp/19166-rtsp.out  /tmp/19247-rtsp.out  /tmp/28890-rtsp.out
$
after text
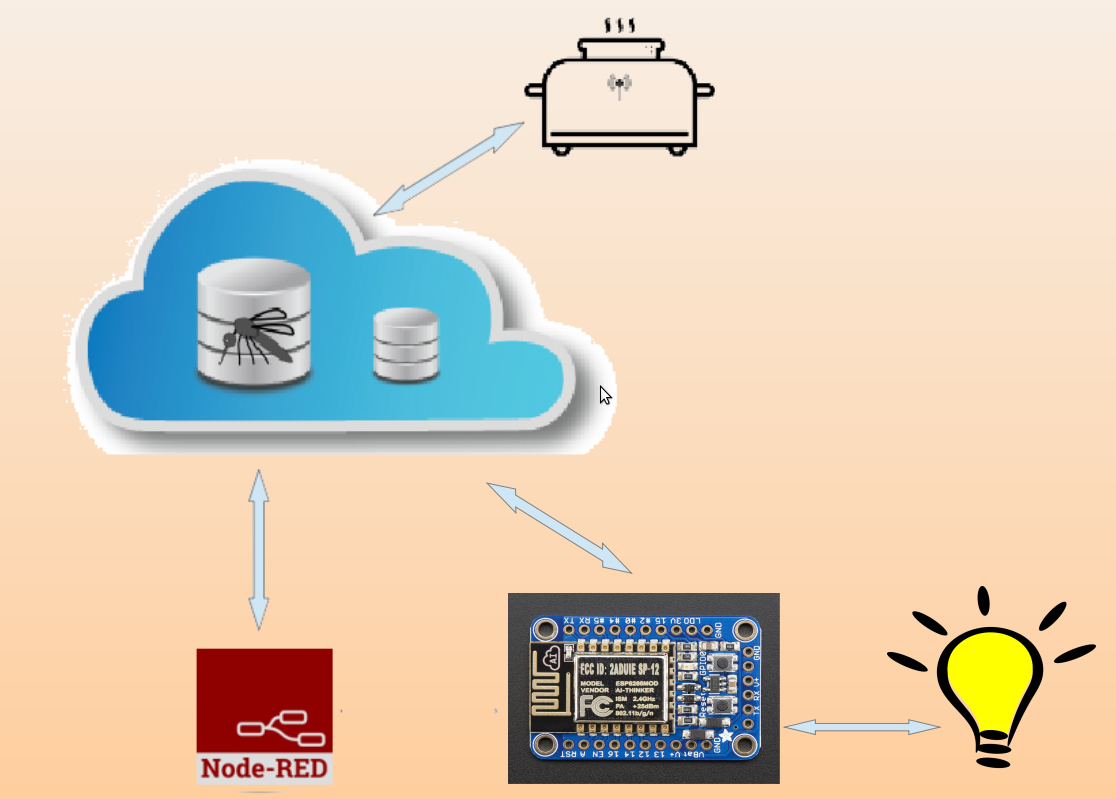
MQTT - Pub/Sub
description of MQTT and tools

# Add the following libraries to your sketchbook libraries (install them with
# the Manage library inside Arduino IDE)
#   pubsubclient (http://github.com/knolleary/pubsubclient/releases)
#   Arduinojson library (5.8.3 or later)
# Optional (see https://github.com/arendst/Sonoff-Tasmota/wiki/Prequisite)
# IRremoteESP8266 ...
#

# IDE -> Sketch -> include Library -> Manage Libraries

$ arduino
File -> Preferences
Settings tab
Additional Board Manage URLS:
http://arduino.esp8266.com/stable/package_esp8266com_index.json
Menu -> Tools -> Board "Arduino/Genuino Uno" -> Board Manager
Enter esp8266 into the search box
click on the esp8266 by ESP8266 Community entry
Install the latest (it should be the one listed in the drop down)
Tools -> Board -> Adafruit HUZZAH ESP8266 (???)
Tools -> Flash Size: (???)

In the Arduino IDE for sonoff select from
Tools -> Board -> Generic ESP8266 Module :
Upload Using: Serial
Flash Mode: DIO
Flash Frequency: 40MHz
CPU Frequency: 80MHz
Flash Size: 1M (64K SPIFFS)
Debug Port: Disabled
Debug Level: None
Reset Method: ck
Upload Speed: 115200
Port: Your COM port (mine is on /dev/ttyUSB2)

Test compile
File -> Examples - ESP8266 -> Blink
^R (or check icon) Verify/Compile
^U (left arrow icon) Upload (and verify/compile if needed)
$
ESP8266
The ESP8266 is the brains of these WiFi boards. 64 KB instruction, 96 KB data, 80MHz/160MHz. It's inexpensive and it works.
- ESP8266, not the ESP8285
- ESP-01
- ESP-01E
- Adafruit Huzzah
- W25Q32 - 32MB/4MB (W25X20, W25Q40, W25Q80, W25Q16, W25Q32, W25Q64, W25Q128, ... )
Arduino IDE
- install ESP8266 env
- install libraries (need the libs)
- install code